
Building an index for your new book is like cleaning a garage; when you get done it looks jut like it should. All the hard work is suddenly invisible. IndexGofer offloads the clerical work, leaving you only the intellectual effort.
This document is a companion to using IndexGofer. When you click a document icon on the IndexGofer workflow diagram, this document is opened to the corresponding section. Each section contains instructions on using the associated program and additional Background information you may need to understand.
The simplest approach is to install IndexGofer into the project directory. Visit the IndexGofer download page and click the button to . When the browser prompts for a destination directory, give the project directory. After downloading, double click the newly downloaded file. One item installed is the IndexGofer logo as a link to the IndexGofer application. Click this logo to start IndexGofer.
IndexGofer requires the Java runtime environment (JRE). See the appendix.
You begin by choosing a list of terms that should appear in the index. IndexGofer helps by picking out the proper noun (capitalized) phrases. Then after the page proofs have arrived, you go through the IndexEdit process. It displays each page and you pick which terms should appear in the index with that page number. Once chosen, they are "entries" for that page. Finally you click a button and the index appears.
At the heart of IndexGofer is a unique concept: "trigger phrases". When you are editing the index, IndexGofer show you each page of your book together with the current index entries for that page. Just before showing a page, IndexGofer scans it and suggests entries where this page should be listed in the final index. You can delete any inappropriate entries and add those that have been missed.
There is no magic. Before starting with IndexGofer's IndexEdit tool you created a list of possible index terms. With each you provided a "trigger phrase". In scanning a page, IndexGofer looks for each trigger phrase. If it finds one, the corresponding index term is added as an entry for that page.
Say one term is "George Washington". You might list it with triggers "washington", "general", and "father of the country". If you chose these triggers carefully, "Washington" will be proposed as an entry for only those pages that discuss him. You want enough triggers that Washington is suggested for each page where he is discussed, but not for many pages where he is not discussed. If any of your triggers appears frequently without reference to Washington, you will have to delete Washington on each inappropriate page. It will be a challenge if the book also talks about the city or state of Washington.
When you talk to your publisher about the index you need to send an email like the following. Or ask the same question in an email.
(salutation)I plan to create an index for my book with ZweiBieren's
IndexGofersoftware. That system recommends that I ask for a couple of items from you right now.First, what file format do you need for the index file. HTML and MicroSoft Word are both easy with IndexGofer. Other formats may be a problem.
Second, what style should we use? Chicago Manual of Style? or some other? Do you have document for authors describing indexing and indexes? The standard IndexGopher appears in the sample below.
Third, are the proofs in PDF? If so can you send us a sample set of proofs from some other project? We need to test to be sure the proofs can be read by IndexGofer. Please don't go to any lengths to do this. If you don't have a sample set of proofs; IndexGofer may succeed when faced with my book's proofs. In the past, IndexGofer has had problems with encoded PDFs and PDFs written with options that cannot be understood by IndexGofer. Exposing these problems before my own proofs are ready can avoid eventual hangups.
(your humble author)
Achen, Christopher, 233
div>Afrobarometer, 205, 335
American NationalElection Studies (ANES), 57
AMLO: See López Obrador, Andrés Manuel
Calderón, Felipe, 85-87, 90-91, 119
campaign volatility, 28, 67-70; aggregate level, 78; individual level, 24, 73
The simplest approach is to install IndexGofer into the project directory. Visit the IndexGofer download page and click the button to . When the browser prompts for a destination directory, give the project directory. After downloading, double click the newly downloaded file. One item installed is the IndexGofer logo as a link to the IndexGofer application. Click this logo to start IndexGofer.
IndexGofer requires the Java runtime environment (JRE). See the appendix.
project-name-index.html
It is better that this not be the same directory as the IndexGofer installation.
Then you can have multiple projects and you can re-install IndexGofer without bothering your project(s).
| Overview | ||||
| ${help.pages.list.TDbody} | 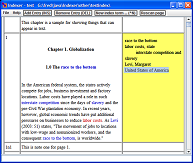
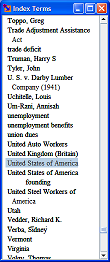
IndexGofer, at the right, displays the pages of a book and the index entries for each page. The index entries for the current page are highlighted with a yellow background. With IndexGofer, you scroll though the book adding/deleting entries for each page. You can also edit and extend the list of terms available to be assigned to pages. as entries.  Index terms are listed in a separate window like
the one at the right. Double clicking an item adds it as an entry
for the current page. Typing in the list window scrolls it to the
first term starting with what you have typed. You can have multiple
terms window scrolled to different places in the list. Index terms are listed in a separate window like
the one at the right. Double clicking an item adds it as an entry
for the current page. Typing in the list window scrolls it to the
first term starting with what you have typed. You can have multiple
terms window scrolled to different places in the list.  TermsEditor (new in Version 3.3) manages the list of index
terms. It displays the terms alphabetically and offers tools for
adding, revising, and deleting terms. A good place to start is with
the File menu's "Scan for Proper Nouns ..." command. You select text
files and it scans them for word strings that might be proper nouns,
instantly creating lots of houn phrases; the majority of which
should be in the index.
TermsEditor (new in Version 3.3) manages the list of index
terms. It displays the terms alphabetically and offers tools for
adding, revising, and deleting terms. A good place to start is with
the File menu's "Scan for Proper Nouns ..." command. You select text
files and it scans them for word strings that might be proper nouns,
instantly creating lots of houn phrases; the majority of which
should be in the index.
Terminology
Entries in the left column above are links to more help:
|
|||
| ${help.title.text.TRbody}
|
||||
| ${help.title.text.TRbody}
|
||||
| Prepare to Use IndexGofer | ||||
| ${help.pages.list.TDbody} | To prepare for creating an index with
IndexGofer:
|
To better understand how index terms are assigned to pages, now is a good time to run the IndexGofer Demo
|
|
You will see a wide main window and a narrow terms list window, both above a help window. The main window has three columns: the page number, the text of the page, and a list of the terms assigned to that page.

| The other window (at the right) is a list of all terms so far defined for the project. ☀Double click a term and it is added to the list for the current page. That is, the page with the yellow background for its terms list. ☀Click a term in a page's list and type the DELETE key. The term is removed from the page.
Below the two windows appears the help window, also available from the menu. It always describes whatever the mouse is pointing at. The beige area is basic stuff and the pink area is more advanced. ☀Hold down the Control key for how-to-type-accent-characters and the Alt key for a list of the shortcut keys. |
 |
When you first move to view a page and its terms area becomes yellow, that terms area will suddenly be populated with terms (wow!) and some phrases in the page's text are colored blue or red. The phrases in the text correspond to trigger phrases associated with the terms. If you ☀click a blue phrase, the corresponding term is highlighted in the yellow area and its trigger phrases are listed at the bottom of the terms list window.
Red highlights in the page text are for phrases that trigger two or more terms. For instance Washington could be the trigger for phrases "George Washington," "Washington, D.C.," and "Washington, state of." ☀Click a red phrase. The terms it triggers are shown in the bottom of the terms window. ☀Double click one to add it to the terms in the yellow area.
Very often the trigger string for a term is the same as the term itself. Sometimes it is part of the term as Franklin may be the trigger for "Franklin, Benjamin." But there is no rule; "peace" may be a trigger for "truce," or vice versa. As an author you need to decide what terms will appear in the index and what text phrases will be the trigger for each term.
IndexGofer runs in a project directory devoted to indexing one book. To begin, this directory must be populated with a few files - IndexGofer itself, the book chapters xxxx.txt, and a list of index terms, indexterms.txt. See the following sections.
After running indexgofer more files will appear in the project directory
PROPER NOUNSxxx-index.txt - one for each chapter. These contain the index entries assigned to each page. If you really need to change an index term that has already been assigned, you can edit these files.
index.txt or index.html - One of these files is created by the Create Index ... option in the File menu. It contains the generated index. Manual processing is generally required to reformat it for submission to the publisher.
The next steps scan plain UTF-8 text - text without markup. So you need to convert your manuscript to that form. ("UTF-8" originally stood for UCS Transformation Format 8; but now its just called "you-tee-eff-eight").
Once your text is in UTF-8, do not edit it. Many editors will blithely trash accented characters in your text.
Instructions follow for converting your text to UTF-8 via a word processor. BUT. Perhaps you have been busy and put this off (aka "procrastinated") so long that a .pdf of your book has arrived from the publisher. If so, you may be able to use Paginator to extract the UTF-8 text. Try the steps in the Paginator section.
Most manuscript editors can produce UTF-8 text. Here's how to do it with MS Word 2010. Other systems may be similar.


Convert the publisher's page-proof file to text. Most editors provide an option for this. IndexGofer expects the "UTF-8" encoding; if your text has no special characters, this will be the same as ASCII. (But beware, even without European alphabets Microsoft Word uses non-ASCII characters for quotes. So you really need UTF-8.)
Break the text file into conveniently sized chunks; IndexGofer calls these chunks "chapters," but any division is acceptable, including the "division" that puts the entire text into one file. The file extension must be ".txt".
IndexGofer needs the page numbers to put into the index. You provide these by inserting code lines in the .txt chapter files. Before the text for each page insert a line having ONLY
where xxx is the page number for the subsequent page. The number may decimal or roman. It may be ppnmm for note mm on page pp. Non-numeric values may also succeed. More about the chapter text files is provided in the Details section of the Handbook.
convert iso-8859-1 to utf-8
iconv -f iso-8859-1 -t utf-8 accented-authors.txt > accented-authors-utf8.txtPARTITIONER
IndexGofer has two schemes for finding proper nouns and they operate on distinct portions of the text. In this task you prepare for this by separating the text into three partitions: Text, Bibliography, and Other. IndexGofer scans the Text for proper nouns. You massage the Bibliography to extract author names. Nothing is done with the Other, so put in it captions, figures, tables, equations, and anything else where capital letters do not signify proper nouns.
In the Partitioner task, you are marking the text with one of three colors.
| White | Text | scanned for proper nouns |
| Green | Bibliography | lines begin with author names |
| Pink | Other | ignored |
Each time you click the mouse, it makes the clicked paragraph be the start of a partition and changes the color in that partition: white to green, green to red, and back to white. Clicking in the last partition will change the color all the way to the bottom of the file. Okay, click the start of the next partition and it will have a different color. Go through the whole file until all partitions have the right color for their contents.
Maybe your chapters are all text, with no bibliography, captions, tables. Perhaps the chapter title should be in the Other partiton (if it has extra capital letters) and otherwise the whole file should be white, which is how it starts. IndexGofer is a tad anal and wants you to run Partitioner on that file anyway. Just start partitioner on it and then quit or move on to the next file.
Partition boundaries are saved in files called chapter__-partitions.txt.
Click a chapter__.txt file in this table to partition it.
| Chapter text file | its -partitions file |
|---|---|
| (Rows of chapter__.txt and chapter__-partitions.txt files) | |
When you have partitioned all your chapters, you can have the text partitions scanned for proper noun phrases. Click:
Details on the hueristic scanning process are in ProperNounScan.
You can again edit the terms list:
Editing here is important because the proper noun scan is imperfect. Among other reasons, it cannot reliably distinguish sentence-starting capitals from sentence-starting noun phrases. Look for phrases that make no sense and delete them with the red octagon at the end of their row. Fret not the names of authors, they are the work of the next step.
xxx
. Those found are added to the list of index terms. This is a hueristic scan that identifies nouns and noun phrases by capitalization. Since capitalization also indicates sentence start, errors occur: some phrases are missed; some spurious phrases are found. The hueristics are especially inappropriate for reference and bibliography sections. These should NOT be included in the text file. Recommendation: Run this option first and prune the list before going on. More about proper nouns below.
To get started building an index terms list it may be useful to have a list of the proper nouns that appear in the text. The installation includes a rudimentary program for sifting your text for proper nouns. No such program will be perfect and this one is a tad simplistic. Here are some of the phrases it extracted from one manuscript:
H. L. Mencken of the Baltimore Sun
Number
O'Hair's
OFA
Obama
Obama Justice Department
Obama and McCain
Obama and the Democratic Party
Obama's
Office of Faith-Based Initiatives
pro-Israel AIPAC
Roe v. Wade
Some of the principles the tool employs are these:
Results will be best if the references section is NOT scanned with this tool. Author names are usually last-name-comma-first-name, which will be parsed as two names by this tool. I suggest emacs or Excel for processing references.
When execution begins, the proper noun scanner will prompt for the name of the file to scan. IndexGofer accepts some words in lower-case within noun phrases. The default list is all pronouns, articles, and prepositions. Words can be added to this list by putting them in a file called phraseControl.txt, one word per line.
xxx
|
First choose a basic style. Press the little triangle to see the options and their samples. |
|
main term, 12, 13; subterm, 123-5 maintenance, 5, 6; See also repairs |
Before the proofs arrive is the time to build the list of terms that will appear in the index. First among these is the concept terms. What is your book about? What is a reader likely to look for in the index? Remember that the index reader may not use the same words for a concept as you do; try to anticipate as many ways of looking up a concept as possible. For war, say, a reader may look under: conflict, belligerence, strife, struggle, battle, conflagration, bloodshed, combat, hostility. At this time there is no need to list proper nouns; IndexGofer provides tools to extract those; as described in the next few sections. (You can run those tools now, if you like.)
I recommend listing the concept terms in a spreadsheet. Terms will occupy the first two or three columns:
The trigger phrase is what IndexGofer looks for when it scans a page. If the trigger is found in the text, the term/subterm on that line is added as an index entry for that page. Here's a sample. The "//" in the first line marks it as a comment.
| // Trigger | Term | Subterm |
| Washington | Washington, George | |
| Father | Washington, George | |
| lie | Washington, George | lies |
| Washington, George | teeth | |
| lie | Truth | |
| truth | Truth |
The third and fourth terms are subterms of "Washington, George." Note that the main term is repeated in the entry for each subterm. This is required by IndexGofer. It is also valuable to you if you want to sort the table in other ways, such as by trigger phrase. All but one entry has a trigger phrase; the fourth has no trigger, so that term will never be automatically suggested when the main IndexGofer application scans a page. Although never suggested by a scan, it will be available for you to add as a term for a page.
The seventh and subsequent columns are ignored. Comments may be entered there.
Additional columns are used for cross reference entries; entries that will appear in the index as "see such and such" or "see also such and such." These are indicated with the word "SEE" in a column. If the previous two columns have text, they are a term and a subterm. The subterm may be omitted. The one column after SEE is the main term that is refered to. If the next column has a word, the reference is to that subterm. Here are some examples cross reference entries:
| Commander-in-Chief | SEE | Washington, George | army | |
| Founder | SEE | Washington, George | ||
| Truth | eternal | SEE | Tao | cosmic |
These rows will result in the following entries in the index:
|
Commander-in-Chief seeWashington, George, army Founder see Washington, George Truth 12, 34, ... eternal see Tao, cosmic |
You needn't worry about being complete; you can add terms as you assign index terms to pages. However, deleting terms is not as easy; if a term has already been assigned to a page, that term will appear in the index, even if it is deleted from the list of terms. The final index can be edited to fix such problems.
If you want a part of an entry to be italic, surround it with <i> amd </i>, as in "<i>Ledbetter</i> decision". Blank lines are ignored and so are those whose first non-blank character is not a letter, digit, or <. The recommended way to start a comment line is "//".
As you work, save the file as a spreadsheet file, concept-terms.xlsx (or .xls). You can save your work and continue at a later time. When the spreadsheet is complete save it one last time. Then use the spreadsheet program's option from its menu to copy the file to a plain-text file named file named concepts.txt. In the dialog box you must pull down the menu from the box and select the option "Unicode Text (*.txt)"; as indicaed by the red pointer in this picture:

To parse concepts.txt into the available terms list, click:
|
|
If you later want to add terms, you can replace concepts.txt and click the button again. Duplicating terms is okay: copies are automatically removed.
Here's how to get started with an empty indexterms.txt. Run IndexGofer (by double clicking its icon). If there is no indexterms.txt file, IndexGofer will prompt you to let it create one in the current directory. Accept the offer. Now click the "Switch to Terms Editor" button and start entering terms.
To get a lot of terms automatically, Choose "" in the menu. The terms created are capitalized phrases from throughout the text. Since senteences start with capital letters that are NOT part of noun phrases, some spurious phrases wil be collected. Bad new: this is annoying; good(ish) news: you get to practice deleting terms.
When providing a text to scan for proper nouns, omit the reference or bibliography section. Capitalization will create spurious terms. Instead, edit the references/bibliography to make a list of authors, one per line. (Lines without commas will be converted by assuming that the last full word on the line is the last name.) Supply this file via the option of the menu.
TERMSEDITAs you scan pages of your text to assign index terms, you will choose from the list in file indexterms.txt; in the previous step you constructed the first version and will make additions in later steps. The list will need work for many reasons, not least because reviewing it in another form will suggest changes.To review and edit the list, click:
|
|
The terms editor has its own help file; here are some highlights:
| Build the Terms List | ||
| ${help.pages.list.TDbody} |
Indexing with IndexGofer means assigning index terms as entries for each page. Cenral to this task is the list of index terms that can be assigned. This list is kept in the project directory as file indexterms.txt, as described in the Details section of theHandbook.
Typing into the Find/Create box causes the table to scroll to the term begining with the current string. Click the Add Term button to add a new main term with the name in the Find/Create box. Editing Cells"Opening" a cell - When you click on a cell in one of the text columns, it "opens" for editing; a box surrounds it and the background is white. You can edit text in an open cell with all the usual text editing operations: mouse selection, text typing, backspace, and all the others. The cell is closed by typing enter or clicking elsewhere. If a cell is selected, but not open, it can be opened by clicking or by typing F2. Unscrolling - If the contents of a cell are changed, it is resorted to its new alphabetic location in the table. This often scrolls the table. To return to the previous scroll position, type alt-left arrow. (This same keystroke is used in browsers for going back to the previous page.) Closing cells - An open cell can be closed by typing ENTER. If a cell is open, and has changed in value, no other operation can be done until the cell is closed. Attempting another operation will close the cell, but not do the operation. To remind you that a cell has closed, every time a cell closes a small whoosh is sounded. So if you try to do an operation and hear a whosh, you will know the operation did not get done. Special keystrokesA number of special key strokes are defined. Arrow keys - If no cell is open, the arrow keys will move the selection from one cell to the next. In an open cell the arrows move the cursor through the text. ENTER - If a cell is open, ENTER will close it. If no cell is open, and a non-text (insert or delete) column is selected, the ENTER key will perform the insert or delete operation dictated by the column. F2 - Open cell - If a cell is selected and not open, F2 will open it. (This is the same as in Excel.) ^Z - Undo - Same as the operation in the menu. ^Y - Redo - Same as the operation in the menu. ^N - Convert name - Same as the operation in the menu. ^S - Save - Same as the operation in the menu. F1 - Help - Same as the operation in the menu. (Use the Browse User's Guide option in the Help menu to open this Guide.)
|
If paginator cannot be made to work, or if the proofs are not even in .pdf, you can fall back to plain text. Extract the text however you can. For .pdf files this means selecting text and typing control-C. Then edit the text to insert page number tags. Before each page insert a line containing "$@nnn", where nnn is the page number. Save this file as pages.txt. IndexEdit will read from this page.
If your publisher sends a sample .pdf file, put it in your project folder. Click it in this list.
| (List of .pdf files in project folder) |
You should see a page of the document in the Paginator application:

If the text is not visible, there may be an error message to explain the problem. Possibly the file is encrypted or locked. Negotiation with the publisher may help. If the file cannot be read, you may have a similar problem when your own proofs arrive. There is a work-around that will add an hour or two.
This is it. Time to populate the index.
IndexGofer will show you a scrolled document with all the pages of each chapter:
The yellow area lists the terms that have been selected for that page. In the page text, phrases in blue have automatically generated phrases. Phrases in red are linked to several phrases, as showon at the bottom of the terms list window:
For each chapter__.txt, processing produces a chapter__-index.txt file. You need to process every page, but IndexGofer does not keep track of which pages you have processed. This table shows your chapters and the -index files that have been produced.
Click a chapter__.txt file in the table to begin or resume processing it for index entries.
| Chapter file | Resulting -index file |
|---|---|
| (List of chapter__.txt and chapter__-index.txt files.) | |
To open the help window, click in the IndexGofer window and type F1.
GOAL: This task is complete when have checked every page of every chapter__.txt. IndexGofer will then have created a chapter__-index.txt for every chapter.
Once the IndexGofer window is open, select from the menu the option for . Some terms will be automatically added to pages because trigger phrases appear on those pages. You may delete these entries. To add other entries, double click on a term in a Terms List window.
IndexGofer will automatically save your work every few minutes and when
you exit. To be safe, you can choose the ""
item from the menu or type control-S.
To do its work, IndexGofer needs a file where the text of each page is preceded by a marker giving the page number. A marker is a line beginning "$@" and followed by the page number. If possible, the markered text file is generated from a PDF file sent by the publisher. Otherwise, markers must be inserted in a text version of the book, as described in Inserting Page Number.
When the PDF arrives, place a copy in your project folder. (I recommend keeping the original pristine in a separate folder reserved solely for source material.) Paginating text from the PDF is the task of the Paginator tool. To start paginator, click the name of a PDF file in this list.
| (List of .pdf files in project folder) |
You will see a window like this, with empty page number cells on the left, page images on the right, and some tools between.
To assign a number to the visible page, type the number into the "Pg #" box. Usually a book begins with front-matter pages numbered in lower case Roman numerals. So click in the top-left page number cell and type an "i" in the "Pg #" box. This amuses me because Paginator immediately numbers all pages in Roman numerals. Now click page number cells until you find a body page and then click on preceding pages to select the one that should be numbered "1"; sometimes it is a blank page. Type "1" into the "Pg #" box. Now, in the best case, your have numbered all the pages. Click pages near the end to be sure the number sequence has not been besmirched with unnumbered pages. (It has happened.) (For even more amusement, you can have Paginator number the pages in Arabic numerals. Type control-alt-digit for each.)
By default, Paginator will extract all the text on every page, including headers and footers. To have it extract just the text, drag the edges of the rectangle named "text" until it surrounds the portion of the page that contains the text. (You can also drag the "header" rectangle to surround the page header. Paginator will parse out the page numbers and check them against your manually set numbers.)
When you extract the text, you need only those pages that have text you will index. You can skip pages that contain the table of contents, tables, figures, and the references section. To do so, select the page numbers and click the Skip Pages button. To select multiple consecutive pages, click the first number and shift-click the last. To select scattered pages, contol-click each.
While choosing index terms for pages, you may want to work on the entire manuscript or you may want to break it up and work on one chapter or section at a time. To create a separate file starting at a given page, select that page and click the "Chap. Name" box. Chapter files are numbered sequentially: chapter0.txt, chapter1.txt, ...
All your work must be done in one session. When you quit, you will be prompted to see if you want to extract chapters according to what you have done.
| (List of chapter__.txt files with page markers) |
This is it. Time to populate the index.
IndexGofer will show you a scrolled document with all the pages of each chapter:
The yellow area lists the terms that have been selected for that page. In the page text, phrases in blue have automatically generated phrases. Phrases in red are linked to several phrases, as showon at the bottom of the terms list window:
For each chapter__.txt, processing produces a chapter__-index.txt file. You need to process every page, but IndexGofer does not keep track of which pages you have processed. This table shows your chapters and the -index files that have been produced.
Click a chapter__.txt file in the table to begin or resume processing it for index entries.
| Chapter file | Resulting -index file |
|---|---|
| (List of chapter__.txt and chapter__-index.txt files.) | |
To open the help window, click in the IndexGofer window and type F1.
GOAL: This task is complete when have checked every page of every chapter__.txt. IndexGofer will then have created a chapter__-index.txt for every chapter.
The three columns of the pages table are the page number, the contents of the page, and the index terms that have been selected for that page. As the page was read in, IndexGofer scanned it for trigger phrases (as given in indexterms.txt). In the image above, the phrases "race to the bottom" and "slavery" resulted in index entries of the same. "Interstate competition" and "Levi" resulted in "labor costs, state" subhead "interstate competition" and "Levi, Margaret." The term United States of America was added with the Add Entry command. The phrase "labor costs" is red because that phrase is the trigger for two different index terms. Neither was automatically listed, so you need to review red phrases to see if any index terms should be added for that page. Selecting the entire red phrase will make the Index Terms window scroll to the alphabetically first term in the Index Terms window. Selecting a blue phrase will cause the selection to jump to the index entry made for that term.
The index entries on the "active" page are hi-lit in yellow. Additions and removal of index entries occur there. When you scroll the text, IndexGofer makes one of the visible pages active and colors its entries section in yellow.As the text is scrolling you will see empty entry areas. That is because the text is not scanned for trigger phrases until the page is made active (and thus has a yellow area).
Letters for European alphabets can be entered with prefix control characters. For example, type control-apostrophe and the letter a to enter á (a-acute). The supported letters are these
|
type a control ↓ and then a letter → |
a | e | i | o | u | y | A | E | I | O | U | Y | c | C | n | N | |
| acute | control-' (apostrophe) | á | é | í | ó | ú | ý | Á | É | Í | Ó | Ú | Ý | ||||
| umlaut | control-" (double-quote) | ä | ë | ï | ö | ü | ÿ | Ä | Ë | Ï | Ö | Ü | |||||
| circumflex | control-6 (digit-6) | â | ê | î | ô | û | Â | Ê | Î | Ô | Û | ||||||
| grave | control-` (grave) | à | è | ì | ò | ù | À | È | Ì | Ò | Ù | ||||||
| tilde | control-~ (tilde) | ã | õ | Ã | Õ | ñ | Ñ | ||||||||||
| cedilla | control-, (comma) | ç | Ç | ||||||||||||||
| slash | control-/ (slash) | ø | Ø | ||||||||||||||
| ring | control-o (letter-o) | å | Å | ||||||||||||||
Rescanning is usuaully unnecessary. Every time a page is made active it is scaned for terms that have been added since the last time the page entries were modified. However, once an entry has been deleted for a page the only way to get it back is by selecting the entry in a terms window and using the Add Entry button.
Commands can be invoked from menus, and also from the keyboard:
|
Command
|
Keystrokes
|
| Add
Entry |
Insert or Control-a |
| Remove
Entry |
Delete or
Control-d |
| Create
new
index term ... |
Control-n |
| Save
entries |
Control-s |


Open Chapter - Prompts
for a new chapter and opens it. The file must be a text file with
extension .txt. Pages in the text must each be preceded with a
line having $@xxx, where xxx is the page number. The directory for
Chapter files is remembered from one editing session to the next.
Save Entries - For
chapter xxx.txt, this command creates file xxx-index.txt and
stores into it all the index entries. It remembers which entries
you have deleted. The chapter is rescanned every time it becomes
active, but deleted entries do not come back. Entries are saved
automatically when you open another chapter, or you exit the
program, or when a five minute timer fires.
Create Index ... - You
are prompted with a list of all the ...-index.txt files in the
current directory. When you click "Index in text" or "Index in
html", the checked files are read, the entries are sorted, and an
index is created in index.txt or index.html, respectively. The
html file can be edited with Microsoft Word to convert it to some
other format. Or with emacs
to modify line endings conveniently.
New Terms Window - A new
instance of the Index Terms window is opened. All such windows
look and behave alike, except that they may be scrolled
differently and each may have its own set of selected entries. The
selection is visible only when the window has the input focus.
Exit - IndexGofer saves
any entries. For filename.txt, entries are saved to
filename-index.txt. Entries are automatically saved when you
switch to another file or exit the program. They are also
saved every five minutes,

Insert Term - D
Delete Term - D
New Term ... - D
Rescan Page - Dasd
asd
 The
Menu
The
MenuA- Displ
A- Displ
A- Displ
 The
Menu
The
Menu - Brings up a window
displaying the ContextHelp file. As the mouse moves across the
IndexGofer windows, the help window scrolls to describe what is
under the mouse. F1 will also raise the ContextHelp window. In
addition, it jumps the mouse to that window without changing the
main window; thus you can explore the Context help.
- In demo mode,
IndexGofer works on a single built-in file and set of index terms.
Creating an index shows it on the screen instead of saving it to a
file. Things to try:
|
If you add "dark" as a term on some page(s), more cross references will appear. (Cross references do not appear unless the term they point at has associated entries.)
- asasdasd
- Displays some mildly useful information, especially the current directory and file name. You should report the version number in error reports.
The bottom lines of the About window display the current directory and current file.
 |
Any term in the"Index Terms"
window can be assigned to any page in the text. Scroll
through the list. Select a term. It turns blue. Click the Add Entry button, and
that term becomes an entry for the current page. Select two
or more consecutive terms. They get blue. Click the Add
Entry button, and they all become entries for the
page. If you want a new term, use the Create new index term ... button. If you want another copy of the entire window, use New Terms Window in the File menu. The contents of the window are derived from indexterms.txt in the same directory as the open chapter. |
Click here to create your index.
Your index has been stored in the project folder as "index.html." It should also now be showing in your browser. You can edit index.html with MicroSoft Word to adapt it as you wish.
That's it! Cheers and cupcakes to you.
If IndexGofer helped, tell a colleague. And I'd be delighted to hear from you, good or bad.
Zweibieren@yahoo.com
After terms have been chosen for each page, it is time to make the index. At the end of the IndexGoferEscort document, click to "Create Index" button. File index.html will be created. The GenIndex program will have created styles embedded in the document, in a separate index.css file, or both. To view the generated index use your browser to visit the generated index.html.
FORMATTING in HTMLOne way to get the index formatted is via a CSS stylesheet. The actual generated index.html file starts:
<dl style="margin:0;">
<dt class='indexgofermainterm'>labor force</dt>
<dd class='indexgofersubterm'>composition of, 67, 94,
96, 103, 131, 188n8–9, 191n10</dd>
Each main term is of class indexgofermainterm and each subterm is class indexgofersubclass. By adjusting the stylesheet, the appearance can change. The IndexGofer default style is:
   <style type="text/css">
      .indexgofermainterm { padding-left: 1em; text-indent: -1em; }
      .indexgofersubterm { padding-left: 1em; text-indent: -1em; }
   </style>
| Install IndexGofer | ||
| ${help.pages.list.TDbody} |
Installing IndexGoferThe download will also have created a shortcut IndexGofer requires JRE, the Java runtime environment for J2SE 1.6 or later. Check your java version at http://www.java.com/en/download/. If your system has not got the latest Java, the site will offer to download it. Input files to IndexGofer are ASCII text files. They are described in the Getting Ready page and in further detail below. Installation on MSWindowsFirst check that you have the runtime for J2SE 1.6 or later. (Check at http://www.java.com/en/download/.) Create an installation directory, such as To run IndexGofer double click on IndexGofer.jar or on the shortcut. If clicking the shortcut fails, see the "Advanced" section below. For convenience copy the shortcut to your desktop or a project directory where you are making an index. To create an entry for IndexGofer in your Start Menu, drag the desktop icon into the "Start" button, pause for the menu to appear, and then continue dragging to the desired place in the menu. To view the full help file locally, you can download InstallIndexGoferGuide.jar Double click to do the install. If you install it in the same directory as IndexGofer.jar, the Help menu item "Browse full Help" will fetch it from your file system instead of the web. ADVANCED for MSWindowsIf typing "java" on the command line does NOT produce "Usage: java [-options] class [args...]"and forty more lines, you may need to reinstall Java. Another option is to explicity name the Java directory in the command. If Java is installed in c:\Program Files\Java\jdk1.6 then the command to run IndexGofer is "c:\Program Files\Java\jdk1.6\bin\java" -jar "xxx\IndexGofer.jar" where xxx is the installation directory you chose. You may want a desktop icon where you can drop a file to edit its index entries. Here's how. Put the following in a file indexgofer.bat: start "IndexGofer" /min java.exe -jar "c:\mydir\IndexGofer.jar" %*Create an icon (with "paste shortcut") and edit its Properties to change the "Target" to the location and name your new indexgofer.bat file. When you drop a file on the icon, IndexGofer will open and start with that file. The approach above creates a terminal window. Deleting that window will terminate IndexGofer. To avoid having the terminal, change indexgofer.bat to: start "IndexGofer" "c:\mydir\IndexGofer.jar" %* To ease the task of adding line numbers to the source file, I wrote a GNU emacs macro. The current page number is in an emacs register. To set it, give the command C-u number \C-x r n pTo insert the current page number and increment the number, invoke the macro: C-zHere is the macro definition: (fset 'page-number [return return ?$ ?@ return left ?\C-x ?r ?+ ?p ?\C-x ?r ?g ?p ?\C-e] ) (global-set-key [26] 'page-number) Other platforms (tested on Mac)Launching from desktop icons and the Start Menu (Microsoft Windows and Unix running GNOME 2.0+) Java Web Start technology can automatically create shortcuts for your application on the desktop and in the Start Menu for Web-deployed applications developed with Java technology. You can use the Java Control Panel to control the shortcut settings. Shortcuts can also be added by using the Java Web Start Cache Viewer, using the install shortcut menu item. Using Java Web Start Software Behind a Proxy Server/FirewallJava Web Start software must be configured with the correct proxy settings in order to launch applications from outside your firewall. Java Web Start software will automatically try to detect the proxy settings from the default browser on your system (Internet Explorer or NetscapeTM browsers on Microsoft Windows, and Netscape browsers on the Solaris Operating Environment and Linux). Java Web Start technology supports most web proxy auto-configuration scripts. It can detect proxy settings in almost all environments. You can also use the Java Control Panel to view or edit the proxy configuration. To find the Java Cache Viewer is an art. Start by launching the Java Control Panel; your desktop may have a shortcut to it, or you will have to find it under the name javacpl in the bin/ directory of the Java runtime (jre) installation. Click the "General" tab and then the button labelled "View" under "Temporary Internet Files". (The control panel layout has changed many times, so look around if you don't find it under exactly the names listed here.) |
To remember the project directory, IndexGofer creates a file ".IndexGofer.ini" in the user's home directory. Thus after the first run, any IndexGofer binary will open the project directory last used. To switch to another directory, use the file:Open menu item to open a chapter file in that directory.
Each section of the book needs to be in the project directory as a text file. Use UTF-8 if an encoding is necessary to report all characters (especially European alphabets and 6's / 9's quotation marks).
Each page of text must begin with a line containing "$@"
and the page number:
$@1
Chapter 1.
Call me Ishmael. ...
The initial .txt file for the book can created by "Save as" from most word processors. In Microsoft Word, the option appears in the dialog box as "Plain Text (*.txt)". (If your word processor lacks this amenity, email me.) When the document contains special characters, MS Word will prompt you for an encoding. Choose "UTF-8" or "Unicode(UTF-8)." After creating the text file, break it up into sections and add page number lines with a text editor. Wordpad works well. Or emacs, if you have it.
IndexGofer does rudimentary formating on text:
Headings are bold and centered.
More about indexterms.txt follows.
The lines of indexterms.txt mostly
define index terms. The simplest form is
phrase WHITE term
where WHITE is some combination of tabs and spaces. Since phrase
and term can each have spaces, WHITE must be at least one
tab or two spaces. More are okay.
The phrase is employed when IndexGofer scans a chapter
text; it scans for instances of the phrase and where it
finds one, inserts the corresponding term as an entry for
the page. When inserting terms from the Index Terms window, only
the term is employed.
Phrase words can contain only letters, hyphens, and apostrophes.
Other characters are ignored. The phrase can be omitted and
then that term is never automatically added to a page by the
initial scan. If the phrase is left out, there must be leading
white space, as in
WHITE term
For narrower categories, index terms are often subdivided with
subterms. An index term with a subterm is written in the form
phrase WHITE term SPACE COLON
SPACE subterm
The corresponding index entry will appear as
term
subterm xx, xx, ... (page
numbers)
Besides terms, indexterms.txt
may contain blank and comment lines. Comments begin with
"//". One comment line can have the form
// title: title words ...
When the index is generated in html, this book title will appear
as the page title for the html page.
The first book indexed had phrases for both New York and New York
Times. This works because the longest phrase found is the one
used. But "York Times" would not work; the text "New York Times"
would be recognized as "New York" and not as an instance of "York
Times".
As terms are added, they are appended to indexterms.txt. Preceding each new term is a comment like this
Neither the term before or after .SEE. can have an associated
phrase. To assign a phrase, put in another line that gives the
phrase and its index term.
For the indexterms.txt line "xxx .SEE. yyy", the Index Terms
window will have a listing of yyy.
Author names are sometimes included in the index. The reference or bibliography section is usually a comprehensive list of these. Unfortunately the large variety of rules for punctuating references makes it non-trivial to identify them by program. Fortunately, they are not hard to isolate with any competent text editor like emacs. To enter author names into IndexGofer, put them in a file with one author per line. Lines without commas will be converted to last-name-comma-given-names by assuming that the last name is a single word. Where this is not the case, enter the name in that format.
Authors of cited works are usually indexed and so the bibliography is a potent source of proper nouns. Sadly. bibliography conventions are a bit too idiosyncratic for automatic name extraction. So you have to do it yourself. The desired result is a file authors-list.txt with one author name per line. (Lines without commas will be converted by moving the last word to first and following it with a comma.) If you can make such a list from other tools, go ahead. Put your list in authors-list.txt. If it has characters other than a-z and A-Z, be sure it is encoded in UTF-8 (or Unicode).
To parse the author names from the bibliography partition, click to run
|
|
This task extracts the Bibliography partition into authors-list.txt. and shows it to you for editing. As you work, it modifies the file. You can interrupt your work and resume later.
Editing: You can treat AuthorParse as a text editor. The goal is one author name per line. Most keys behave as usual, including BACKSPACE, DELETE, HOME, END, and the arrow keys. Mouse clicks change the selection as usual. In addition, AuthorParse defines special keys for morphing typical bibliography entires into author names:
So if a citation is
And the selection is at the beginning of the line, you would reduce thecitation to two lines containing "Heilemann, John" and "Halperin, Mark" by typing:
| TAB | select the ", " after Heilemann |
| TAB | select the ", and " |
| ENTER |
convert ", and " to a newline, leaving "Heilemann, John" on its own line |
| TAB | select the ". " after Halperin |
| ENTER | convert the ". " to a newline and convert name to "Halperin, John" |
| ENTER | delete the rest of the citation and any surrounding newlines |
After this the cursor is at the beginning of the next bibliography entry, ready to go again.
For other deletions, select the text and type the DELETE key. In particular, to delete lines, I mouse click at the left of the first line, type control-down-arrow to select additonal lines, and then type DELETE.
A few other key combinations have special definitions. Look for them on the right in the menu. To convert names from first-last to last-comma-first type control-n. To do the reverse, type control-u. To process bibliography entries from another file, choose from the menu. The chosen file will be copied to the end of the working file, authors-list.txt.
When you have converted all of authors-list.txt, click this button to insert those names in the terms list.
|
|
To see the current list of terms:
|
|
To convert names from first-last to last-comma-first, type control-n. (Control-u is not implemented here.) After typing control-n, the list will be scrolled to the place where the revised entry fits. To scroll back to where you were, type alt-left-arrow. (This is the same key that browsers offer as a shortcut for the BACK button.)
 The TermsEditor window, at right, has,
top-to-bottom, menu bar, the Find / Create line, the table of
index terms, and a message line.
The TermsEditor window, at right, has,
top-to-bottom, menu bar, the Find / Create line, the table of
index terms, and a message line.  Typing accented characters
 Columns
 Edit
Edit