IndexGofer ${version.number} (${build.number}${build.suffix} ${build.date})
IndexGofer Details
As this chart shows, creating an index begins with the manuscript. You also need to create a list of concept terms and then get the proofs from the publisher. Before the proofs arrive, you apply IndexGofer tools to the manuscript and concept terms list, arriving finally at indexterms.txt, an initial list of all the terms available for your index. In the IndexGofer step itself you peruse a page-numbered version of the proofs selecting for each page a set of terms from indexterms.txt.
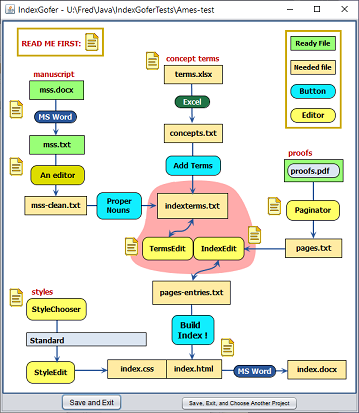
Items in wave-bottom boxes are files. You supply the ones in green borders; all the rest are generated. Names outside boxes are program. Most are run by clicking buttons. The bold-face ones (Partitioner, ParseNames, Paginator, and IndexGofer) require some work.
To remember the project folder between executions, IndexGofer stores a file called .IndexGofer.ini in your "home directory" or the "current directory." The contents of this file are a single line saying
currfile=xxxx
where xxxx is the project directory. If the contents are ill-formatted, you can delete the file and restart IndexGofer. After you browse to the project directory, its location will again be saved to .IndexGofer.ini.
Your home directory is the parent directory for all your files and subdirectories. Unix and Mac users are often taught this early on; Windows does its best to hide it from view. On windows 7 and higher your home directory is the directory that contains your "My Documents" directory. Typically C:\Users\yourname. On earlier Windows systems the directory was c:\Documents and Settings\yourname\, where the defaultvalue for yourname was "Owner". IndexGofer is stymied if it has no permission to write to your home directory or the file .IndexGofer.ini is read-only or a directory. You can correct the situation by moving the the existing .IndexGofer.ini somewhere else or deleting it.
The current directory is a secondary location for .IndexGofer.ini. This concept is familiar on Unix and the Mac. On Windows it can be set on the "shortcut" that opens IndexGofer. Right-click on the shortcut icon and select "properties." Fill in the project directory as the value of the line labeled "Start in." IndexGofer will not store .IndexGofer.ini in the current directory, but it will find it there if there is none in your home directory.
A "progenitor" file is one that contributed to the construction of the given file: concept-terms.xls is the only progenitor to concept-terms.txt. If a one of a file's progenitors has been modified after creation of the file, then tht file is out-of-date. This is not necessarily a grevious problem; you may have just corrected a spelling in the progenitor. But an out-of-date file may indicate that changes have been made that ought to appear in the final index, but won't.
The sequence of file dependencies are these
chapter__ chapter__-partitions author-list indexgoferms.txt chapter__-index
concept-terms.xls concept-terms.txt indexterms.txt
mss.pdf chapter__-paged chapter__-index index.html index.docIn each case the progrenitors precede the generated file. There is no necessary relation between files in different lines.
Proper Nouns List
The Proper Nouns scan creates terms from capitalized phrases throughout the text. Since senteences start with capital letters that are NOT part of noun phrases, some spurious phrases wil be collected. Bad new: this is annoying; good(ish) news: you get to practice deleting terms. The scan is hueristic>is is a hueristic scan that identifies nouns and noun phrases by capitalization. As an example of the problems, here are some of the phrases extracted from one manuscript:
H. L. Mencken of the Baltimore Sun
Number
O'Hair's
OFA
Obama
Obama Justice Department
Obama and McCain
Obama and the Democratic Party
Obama's
Office of Faith-Based Initiatives
pro-Israel AIPAC
Roe v. Wade
Some of the principles the scan employs are these:
- Generally, a proper noun is capitalized and a noun phrase is a sequence of proper nouns.
- First words of sentences are ignored. A sentence ends with period, question mark, or exclamation point. If a sentece begins "Barack Obama ... " only the Obama would be extracted as a proper noun.
- Noun phrases extend through capitalized words and through words that are articles, prepositions, and conjunctions. Sometimes this inadvertently combines two phrases as in "Obama and the Democratic Party."
- Words with mixed-case like eTrade and eBay are considered proper nouns.
- Apostrophes and dashes are accepted if contained within words.
- Noun phrases do not contain other punctuation; not even commas. The phrase "Number" above follows a colon in the text.
- A single capital letter followed by a period is treated as a proper noun. "v." is a noun as a special case.
IndexGofer accepts some words in lower-case within noun phrases. The default list is all English pronouns, articles, and prepositions. Words can be added to this list by putting them in a file called phraseControl.txt, one word per line
If Paginator has failed to read the .pdf file, you can manually insert page numbers in your chapter__.txt files. Copy each to a file named chapter__-paged.txt. Edit the text with some editor; wordpad or notepad will do. (This step may convert your accented characters improperly. It does not matter, the text is not carried into the index text.) Compare the text with a printed copy of the proofs. Before each page insert a line having ONLY
$@xxx
where xxx is the page number for the subsequent page. The number may decimal, roman, arabic, or alphabetic. It may be ppnmm for note mm on page pp. Prefixes are also allowed, as in A-3 or 1.2.3.
The page number after "$@" is not limited, though only number can be generated by Paginator. To insert other sortsof numbers, edit the chapter__-paged.txt file as noted above.
For note numbers like "32n4" for note 4 on page 32, insert a number line before the note. Something like
$@32n4
References to tables are supposed to be bold. Mark them as such with HTML <b>tags:
$@<b>57</b>
References to figures are supposed to be italic. Mark them as such with HTML <i>tags:
$@<i>42</i>
If Paginator fails to show pages of your manuscript, there are two ways to go. Perhaps your publishercan correct this by enabling the pdf it for text extraction, decrypting it, or supplying a password. If so place the revised .pdf in the project folder and continue with Paginator in IndexGoferEscort. If that too fails, Perhaps you can extract text with Adobe Reader (download, be sure to uncheck the noxious box that bundles McAfee). At worst, you can use the text you derived from your submitted document.
Whichever way you get the text, you now need to insert page markers. A marker is a separate line before each page containing "$@" and the page number. One way to do this is with
After you click the button to turn on marking, each click in the text inserts the next successive page number. The page number box indicates what number was most recently inserted. Changing it will change that inserted marker and the values for all subsequent clicks.
The Chapter number tool will insert a chapter marker to splt the file into files for multiple chapters.
When you are done, select from the menu. The chapter files generated are listed here
List of chapterxxx.txt files
GOAL: This task is complete when for every chapter___.txt there is a chapter___-paged.txt.
You may want to combine several files into one; for instance to combine chapter files. For files encoded in UTF-8, many approachs wind up changing or deleting accented characters. So IndexGofer offers a tool. Click this button to concatenate multiple text files from your project folder.
![]()
The tool first offers a list of the .txt; click the checkboxes for those you wish to concatenate. (They will be concatenated in the order given. You could change the names in the folder to have leading numbers in the desired order: 01, 02, ... 11, .... In any case, the output will be in file concatedText.txt.
There is a less tedious way to convert word documents to text. It is a bit involved and requires tinkering with your word document template. Moreover, I have here only my notes. Eventually they may get expanded into something useful.
- find the normaltemplate.dotm
- copy it to your own directory
- edit a word document
- open the normal template
- view macros
File->options; Trust Center->Trust Center Settings (a button);Trusted Locations;
C:\Users\Fred\AppData\Roaming\Microsoft\Templates\
options->Advanced->FileLocations (very near the bottom)
set User Templates value
Sub SaveUTF8()
Set fso = CreateObject("Scripting.FileSystemObject")
pathname = fso.GetParentFolderName(ActiveDocument.FullName)
BaseName = fso.GetBaseName(ActiveDocument.FullName)
FName = pathname + "\" + BaseName + ".txt"
isok = MsgBox("Creating " + FName, vbOKCancel)
If (isok <> vbOK) Then Exit Sub
ActiveDocument.SaveAs2 FileName:=FName, _
FileFormat:=wdFormatText, LockComments:=False, Password:="", _
AddToRecentFiles:=True, WritePassword:="", ReadOnlyRecommended:=False, _
EmbedTrueTypeFonts:=False, SaveNativePictureFormat:=False, _
SaveFormsData:=False, SaveAsAOCELetter:=False, Encoding:=65001, _
InsertLineBreaks:=False, AllowSubstitutions:=False, _
LineEnding:=wdCRLF, CompatibilityMode:=0
End Sub
- edit normal (from file menu in a word doc)
- options->Customize Ribbon
- right click on Home ->
- add new group
- right click on new group change name to IndexGofer; you can pick an icon
- Choose Commands From-> macros; click Normal.IndexGoferMacros.SaveUTF8
- In the middle, click Add>>
- Where the macro was added, click it and pick the rename button below the box
- A good name is SaveUTF8
- File->Save
- Exit
When you start to edit any document with MS Word, a security banner appear atop the window. If you click enable, you are enabling the macro you just added. Click the Enavble Content button to get a working verion of the SaveUTF8 button.
When you click the SaveUTF8 button, it prompts for OK or CANCEL.
Removing the button does not eliminate the security banner.
To remove a macro
- open any doc file and from File-Opn, open normal.dotm
- View->Macros ->view
- type a name in the top box and select Create (this is how to get the macro editor)
- in the top left click on the name of a macros file, listed under Modules (or not, depending on the "Toggle Folders" click
- right click and select the menu option to "Remove NewMacros" (or whatever you have called the macro) and right click and Remove IndexGofer Macros