How to Use Blox and BloxLayout
BloxLayout, like its namesake BoxLayout,
either stacks its components in a column or ranges them in a
row. Here is a vertical Blox of three horizontal
Bloxes, each showing three labels:
 |
Blox row(String a, String b, String c) {
   return Blox.createHorizontalBlox(
      centeredLabel(a),
      centeredLabel(b),
      centeredLabel(c)
   );
}
Blox matrix() {
   return Blox.createVerticalBlox(
      row("A", "B", "C"),
      row("D", "E", "F"),
      row("G", "H", "I")
   );
} |
Blox provides all the same constructors and
methods as Box. If you textually replace "Box" with "Blox" in
a working program, the program will continue to compile and run. So if you
know Box you
can use Blox. However, there
are significant differences:
Bloximplements different (better!) defaults for spacing and alignment.-
Bloxexploitsvarargsto streamline construction code. - You manage layout options by inserting
Blox.Noteelements in thevarargslists. BloxSectiondelimiters can control how space is distributed between the Components.
Definitions
Let's define some terms by looking at the example above. Each row was created with an expression like this
Blox.createHorizontalBlox(
new JLabel(a), new JLabel(b), new JLabel(c)) |
- components
- The
JLabelarguments are the "components" of theBlox. Typically, they are in factJComponents. - principal axis
- The "principal
axis"
of the
Bloxis the direction in which its components are placed; the expression above creates a Blox with a horizontal principal axis (X_AXIS). The alternative is a vertical principal axis (Y-AXIS). - cross-wise axis
- Perpendicular to the principal axis is the "cross-wise axis". For each point on the principal axis there is at most one component on the cross-wise axis.
- Alignment
- "Alignment" options affect the placement of each object on the cross-wise axis. Please remember, there is no alignment with respect to the principal axis. Alignment on the principal axis must be done with glue, struts, borders, or sections.
A First Example
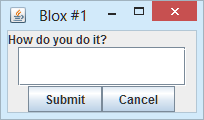
FirstBloxDemo displays a label, a scrollable text area, and two buttons. The bold code creates the window's components.
package blox;
import com.physpics.tools.ui.blox.*;
import java.awt.Color;
import javax.swing.*;
public class FirstBloxExample {
   public Blox makeBlox() {
     return Blox.createVerticalBlox(
        new JLabel("How do you do it?"),
        new JScrollPane(
            new JTextArea(1, 15)),
        Blox.createHorizontalBlox(
            new JButton("Submit"),
            new JButton("Cancel")
        )
     );
   }
   public static void main(String[] args) {
      new FirstBloxExample()
         .makeBlox().openWindow("Blox #1");
   }
} |
|
 |
makeBlox in
FirstBloxExample.java
The return statement in makeBlox creates a vertical Blox and populates it with three components,
a label, a scrolled text area, and a second Blox—a horizontal one with with two
buttons. Note that the Blox creators, createHorizontalBlox and createVerticalBlox both
accept an arbitrary list of components. They each create a Blox,
set its layout to a BloxLayout, and populate it with
the listed components. The Blox itself is a JPanel so
it supports arbitrary drawing as well as the adding of components.
This and all other examples have been displayed by calling Blox's openWindow(title) method. Although simplistic, it works well for demo and test cases. It asks the Blox for its preferred size, adds 20 in both directions, and opens the Blox in a window of the computed size.
Like its predecessor Box, Blox can manage the layout
for an arbitrary Component and it can add components one-at-a-time.
Here is the (longer) code done Box-style
package blox;
import com.physpics.tools.ui.blox.*;
import javax.swing.*;

public class FirstBloxLongForm {
    public JPanel makeBlox() {
        JPanel val = new JPanel();
        val.setLayout(new BloxLayout(val,
                BloxLayout.Y_AXIS));
        val.add(new JLabel("How do you do it?"));
        val.add(new JScrollPane(
                new JTextArea(1, 15)));
        JPanel buttons = new JPanel();
        buttons.setLayout(
            new BloxLayout(buttons, BloxLayout.X_AXIS));
        buttons.add(new JButton("Submit"));
        buttons.add(new JButton("Cancel"));

        val.add(buttons);
        return val;
    }
    public static void main(String[] args) {
        JPanel contents = new FirstBloxLongForm().makeBlox();
        Blox.createVerticalBlox(contents)
                .openWindow("Long Form Blox One");
    }
} |
The following sections discuss BloxLayout in more detail:
Notes in Component Lists
While adding components to a Blox it is sometimes useful to
control how it treats its incoming components. With Blox, components
are typically added as a list, so controlling the Blox would require
interrupting and resuming the list. (The list can be resumed with addMany().) Blox has an easier way.
Blox defines Note objects. A Blox.Note is
a component that receives callbacks from appropriate points during the layout
process. Typically the Blox.Note itself has zero width and
height so it does not affect the screen image.
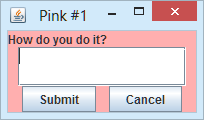
Several useful types of notes are predefined and will be described in coming sections. One simple example is Blox.color() which returns a Blox.BkgdColorNote. This note sets the background color of the Blox;
the color that shows through where there are empty spaces or transparent children. An instance is the first bold line in this:
 |
return Blox.createVerticalBlox(
   Blox.color(Color.pink),
   new JLabel("How do you do it?"),
   new JScrollPane(new JTextArea(1,15)),
   Blox.crossSizeFull(false),
         Blox.createHorizontalBlox(
             new JButton("Submit"),
             Blox.strut(13),
             new JButton("Cancel")
         )
   );
} |
The second bold line inserts a strut which shows as 13 pixels of space between the buttons.
makePinkBlox in
FirstBloxExample.java
A Blox.Note is a JComponent and, like any other JComponent, it can be added to no more than ONE parent. A few Notes can be usefully inserted in non-Blox containers; but most will be ignored if not inserted in a Blox.
Creating a Note subclass
You may want to create your own subclass of Blox.Note. For instance, a note class
to set a cursor for the Blox. You write a subclass of Blox.Note and override the method readyToAdd. This method is called as the Note is about to be added to the parent Blox's list of components. If it returns true, the component will be added and will participate in layout; by default it has zero size and will not affect the display. For setting a cursor, it is sufficient to do that upon insertion into the parent, so the Note can return false to avoid addition. The new subclass looks like this:
static class CursorNote extends Blox.Note {
    String cursor;
    CursorNote(Cursor c) { cursor = c; }
    boolean readyToAdd(int index) {
        getParent().setCursor(cursor);
        return false;
    }
} |
Such a note could be included in a Blox like this
createVerticalBlox(
new CursorNote(myCursor), compA, compB ···) |
Spacing on the principal axis
On the principal axis, each Blox component butts
up directly against its neighbors. To add a little space, you can insert a
"strut" between two components. When the Blox is
bigger than needed for the preferred sizes of its components, all those at
less than their maximum size are expanded. To avoid this expansion you can
insert "glue".
(You can also space two components by adding
a border to
one or both.)
Struts and glue are created by Blox methods:
Blox.glue()- A glue space, takes as much space as it must to allow its fellow components to show at their preferred size. If there are more than one glue components, they will split the excess space equally.
Blox.strut(size)- A strut component takes up a fixed amount of space, as given by the argument; in pixels. To give the space in points you can write
Blox.strut(Blox.pointsToPixels(width))
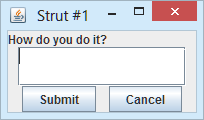
With a strut we can add space between the buttons in FirstBloxDemo. The bold lines show how:
 |
JComponent strut10() {
    return Blox.strut(
         Blox.pointsToPixels(10));
}
public Blox makeBlox() {
   return Blox.createVerticalBlox(
      new JLabel("How do you do it?"),
      new JScrollPane(
            new JTextArea(1, 15)),
      Blox.createHorizontalBlox(
         new JButton("Submit"),
         strut10(),
         new JButton("Cancel")
   );
} |
makeBloxWithStrut in
FirstBloxExample.java
The result is two centered buttons separated with 10 points of space. Note that strut10 is a method and not a constant; like all Components, struts cannot be reused in multiple Containers..
Now that high resolution screens are in wide use, adjusting sizes by pixels is (ahem) pointless. Well actually it is just wrong. But compatibility concerns prevented a switch in Blox to anything else. As a step in the right direction, Blox offers the methods pointsToPixels and pixelsToPoints to convert between point and integer spacing. Usage of pointsToPixels is demonstrated in the above code.
Struts and glue spaces are both implemented as instances of the Blox.Filler class. (All Notes are subclasses of Filler.) For more precise control of sizes it is sometimes useful to construct a Filler directly and give it a size by calling its changeShape method.
(Glue and struts behave differently from those constructed in Box. Glue components
in Box are treated as any other component. So if there is more than enough space for
a Box, all components with maximum size exceeding preferred size will expand
in tandem. Struts in Box have a large maximum cross-wise size, so parent Boxes
may request more space than they ought.)
Alignment on the cross-wise axis
Alignment takes place on the cross-wise axis. If a component is big enough to fill the Blox in that direction,
there is no alignment issue; the component will fill the Blox. Smaller
components are aligned according to the getAlignmentX for horizontal alignment and getAlignmentY for vertical alignment. That parameter specifies the fraction of the extra space that will be placed above/left of the component. (Remember that alignment is cross-wise. getAlignmentX affects placement in a vertical Blox and getAlignmentY applies in a horizontal Blox.) Other sections below will note the effect of baselines and the Notes created by Blox.crossSizeFull; and Blox.baseAlign.
Alignment in Vertical Bloxes
In a vertical Blox, there is only one component at each vertical point. That component may be shifted left or right by its alignmentX value
Alignment is implemented by splitting any extra space according
to the value of the component's getAlignmentX. In this image,
that value is shown as the contents of each JTextField:
 |
JTextField aJText(double align) {
    return {a JTextField with align as its
     alignmentX, text, and color basis};
}
return Blox.createVerticalBlox(
    aJText(0.0),
    aJText(0.1),
    aJText(0.5),
    aJText(0.65),
    aJText(1.0)
); |
varyAlignment in
BloxVerticalDemo.java
On line with the green Blox, for instance, there are 53 unoccupied pixels. For the alignment of 0.1, BloxLayout allocated
5 pixels (0.1 * 53) to the left of the field and the remaining 48 to the right.
(With Box that field would be toward the right side of the window.)
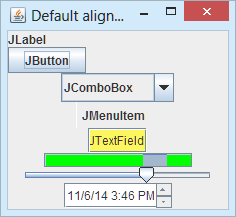
Java Swing components generally default to center alignment, but JLabel and JButton align to the left. This demo shows some sample components with default width and alignment:
 |
return Blox.createVerticalBlox(
   new JLabel("JLabel"),
   new JButton("JButton"),
   new JComboBox<>(new Object[]
       {"JComboBox",
        "Second Choice"}),
   new JMenuItem("JMenuItem"),
   new JTextField("JTextField"),
   new JProgressBar(0,100),
   new JSlider(-10,10,3),
   new JSpinner(
         new SpinnerDateModel())
);
(code to set the two colors has been omitted) |
simpleComponents(false) in
BloxVerticalDemo.java
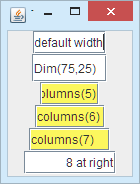
Since JTextFields are for user input, their default size is usually
too small. They can be given larger sizes with setColumns or setPreferredSize as here:
 |
return Blox.createVerticalBlox(
    new JTextField("default width"),
    new JTextField("Dim(75,25)"){{
            setPreferredSize(
                new Dimension(75,25));
    }},
    textField(5),
    textField(6),
    textField(7),
    new JTextField("8 at right"){{
        setHorizontalAlignment(
                JTextField.RIGHT);
        setColumns(8);
    }}
); |
textWidths in
BloxVerticalDemo.java
The first line is the default width (for the given contents), the second line
was sized with setPreferredSize(75, 25). The remaining lines were sized
with setColumns for the indicated number of columns. Note the
alignment in the last line. The field itself is center-aligned, just as are
the others; but the contents are right aligned. This was done with setHorizontalAlignment as shown in the code.
The Blox.crossSizeFull Note
Blox emphasizes sizing components at their preferred cross-wise
size, regardless of whether their maximum size is larger. When inserted in
a bigger
Blox,
the component is positioned according to its alignment, leaving empty the adjacent Blox space.
In contrast, Box would
have enlarged the component up to its maximum size. To permit you to request Box-like
behavior. Blox has
a CrossSizeFull parameter; it is false by default. If set true,
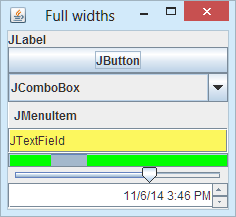
then the cross-wise size of components will expand as far as possible. When CrossSizeFull is set true the various-components example looks like this
 |
(same as above, but the bold line has been added)
return Blox.createVerticalBlox(
   Blox.crossSizeFull(true),
   new JLabel("JLabel"),
   new JButton("JButton"),
   new JComboBox<>(new Object[]
       {"JComboBox", "Second Choice"}),
   new JMenuItem("JMenuItem"),
   new JTextField("JTextField"),
   new JProgressBar(0,100),
   new JSlider(-10,10,3),
   new JSpinner(new SpinnerDateModel())
); |
simpleComponents(true) in
BloxVerticalDemo.java
The CrossSizeFull parameter is set with Blox.crossSizeFull(true).
and reset with Blox.crossSizeFull(false). When Notes are inserted among a Blox's list of components they
affect all subsequently added components until supplanted. Hence one can turn on the option for only one component:
return Blox.createVerticalBlox(
    new JLabel("JLabel"),
    Blox.crossSizeFull(true),
    new JButton("JButton"),
    Blox.crossSizeFull(false),
··· |
Alignment in Horizontal Bloxes
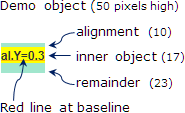
For a horizontal (that is X_AXIS) Blox, alignment adjusts the vertical size, baseline, and positioning of components. To demonstrate, it will be useful to have a little component whose height and alignment can be adjusted, The one used below is an outer green rectangle containing an inner JLabel and a red line:
 |
static Blox horBlox(int height,
      double alignY, JComponent inside) {
   // create or tailor the inside component
   if (inside == null)
      inside = new JLabel("al.Y="+alignY);
   inside.setAlignmentY(alignY);
   {set color of 'inside' to Color.YELLOW}

   // create the outer Blox
   Blox outer = new Blox(BloxLayout.X_AXIS){
      {override paintChilden and have it
           paint the red line after kids}
   };
   outer.setAlignmentY((float)(alignY*alignY));
   {set height of outer Blox by
       setting its preferred & max sizes}

   // add the inner object to the outer Blox
   outer.addMany(
      Blox.color(Color.getHSBColor((float)
             (alignY*0.8+0.2),0.3f,0.9f)),
      Blox.glue(), inside, Blox.glue());
   return outer;
} |
horBlox in
BloxHorizontalDemo.java
The outer rectangle is the full demo object. It is itself a horizontal Blox with only one component. The default inner object is a JLabel whose text is the value of the Y alignment parameter. The Y alignment value specifies the fraction of extra space to be allotted above the inner object. For an outer box of size 50 and an alignment of 0.3, the alignment space is 10, as shown A silly little expression converts the Y alignment value into a color for the outer Blox.
The red line is drawn at the baseline. When BloxLayout is aligning baselines (the default), the baseline of the outer Blox is determined by the baseline of the contained JLabel. so the red line is the baseline of both the inner object and the Blox itself. Diverse horBlox demo objects can be created by varying the three parameters. For the above image the creation was
horBlox(30, 0.3, null) |
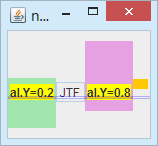
To demonstrate vertical cross-wise alignment in a horizontal Blox, this image combines two demo objects, a JTexrField, and an orange blob.
 |
return val.addMany(
   horBlox(50, 0.20, null),
   new JTextField("JTF"){{
      setHorizontalAlignment(JTextField.CENTER);
      setEditable(false);
   }},
   horBlox(70, 0.80, null),
   new JPanel(){{
      setPreferredSize(new Dimension(10,10));
      setBackground(Color.ORANGE);
      setOpaque(true);
   }}
); |
simpleComponents(true) in
BloxHorizontalDemo.java
The green and pink components are demo objects with alignments of 0.2 and 0.8 (and correspondingly different colors). The white component is a JTextField and the orange is a plain JPanel with a background color. Some things to note:
- The orange box has a vertical alignment of 0.5., the default for a
JPanel. - The yellow boxes are at the given alignment with respect to their parent demo objects.
- The three components with base lines have them aligned
- To align baselines and also honor placement of objects within their parents, the parents must start at different heights.
- The overall
Bloxextends from the top of the pink to the bottom of the green - The
JTextField'sbaseline is aligned with the others. (The thin blue lines are the baseline for the overall object.)
The Blox.openWindow method asks the Blox what size it prefers and gives it a window 20 pixels greater in both directions. Thus the gray portions at top and bottom. The horizontal excess has been distributed to the JTextField and the orange box.
The AlignBaselines Parameter
In the sample above, the base alignment parameter has its default value of true. Thus the baselines of the pink and green objects are aligned; You may want to ignore base lines, They can be ignored by adding a Blox.baseAlign(false) note among the components of a Blox. (It can be turned on again with a true parameter; it can be turned on and off between components so some will align and others will not. If we repeat the demo above with baselines unaligned, we get this:
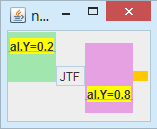 |
|
(same as above, but the bold line has been added)
return val.addMany(
   Blox.baseAlign(false),
   horBlox(50, 0.20, null),
   new JTextField("JTF"){{
      setHorizontalAlignment(JTextField.CENTER);
      setEditable(false);
   }},
   horBlox(70, 0.80, null),
   new JPanel(){{
      setPreferredSize(new Dimension(10,10));
      setBackground(Color.ORANGE);
      setOpaque(true);
   }}
); |
The base lines of the components now have no relationship one to the other.
simpleComponents(false) in
BloxHorizontalDemo.java
Note that the alignments of the pink and green objects are 0.04 and 0.64 because horBlox set the demo object 's alignmentY value to the square of the inner alignmentY. (Squaring was chosen as a way to generate a distinct random alignment.) This illustrates that Bloxes have their own alignment with respect to their parent and that this is independent of the alignment of children within the Blox.
Changing Sizes
BloxLayout depends on a component's requested minimum,
preferred, and maximum sizes. For best results you may need to adjust these
values. For example, a button's maximum size is generally the same as its
preferred size. If you want the button to be drawn bigger when additional space
is available, then you need to change its maximum size. (Note that in some cases
BloxLayout ignores the maximum size. If this is a problem, add
glue.)
You can change the minimum, preferred, and maximum sizes by invoking the appropriate setXxxSize method
(which is defined by the JComponent class). For example:
comp.setMinimumSize(new Dimension(50, 25));
comp.setPreferredSize(new Dimension(50, 25));
comp.setMaximumSize(new Dimension(Short.MAX_VALUE,
Short.MAX_VALUE)); |
For struts and glue all three sizes can be set with a single call to the changeShape method.
Here are two tricks to help isolate size trouble in a Blox layout:
- Add a background color to the
Bloxor some of its components. This lets you see what size they really are. For example:
return Blox.createVerticalBlox( Blox.crossSizeFull(true), Blox.createHorizontalBlox( Blox.color(Color.CYAN), new JScrollPane( new JTextArea(1, 15)) ) );MethodHere we can see that the inner, horizontalmakeTextRowsin FirstBloxExample.javaBloxoccupies the full space but gives only the requested portion to theJTextArea. (It does not give more because horizontalBloxes do not adjust the size of components that have baselines, which aJTextAreadoes.) - Use the
debugnote to haveBloxLayoutprint its perceived size constraints.
Debug information includes size request profiles as <min:pref:max> and space allocated configurations as width x height @ upperLeftX , upperLeftY. For the "text area" example, the horizontalBlox.createHorizontalBlox( Blox.debug(true), Blox.color(Color.CYAN), ··· );Bloxand theJScrollPaneboth have a a cross-wise size profile <min:pref:max> of<19:19:MAX>. ButopenWindowand the outerBloxallocate space of188x39@0,0to the innerBloxwhich in turn allocates only188x19@0,10to theJScrollPane. The listing also shows that theJScrollPane/JTextAreahas got a baseline. It is because of this baseline that the horizontalBloxdeclines to give the text area anything more than its preferred size.
As the Window Changes Size
An important aspect of spacing is how layout change as the user changes the size of the window. Layouts that do not change as the window changes may look pretty, but they may deprive the user of needed flexibility to see some fields with unusually sized values.
Often a window has a single field that should get all additional space as the user changes the window size. In the case of FirstBloxExample, this is the JTextArea in the middle. It is not apparent from the images shown so far, but the example code fails to widen the field when the window widens. You can see this in the first row of the next table. The first two columns show the window when it first opens and after dragging the lower right corner to make the window higher and wider. The third column shows the code that created the layout.
To shorten the code, these definitions apply:
Color cream = new Color(0xFFFDD0); // JComponent textArea() { // text entry JTextArea area = new JTextArea(1, 15); area.setBackground(cream); return new JScrollPane(area); } JComponent strut10() { // spacing return Blox.strut(Blox.pointsToPixels(10)); } JComponent buttons() { // buttons |
| initial window | bigger window | Code |
|---|---|---|
This exploration kicks off from the version of FirstBloxExample with a strut between the buttons. Note that the text area width does not get bigger as the window does. The height expands as the window because it is the only component of the outer Blox with a maximum height greater than its preferred height. |
||
 |
 |
new JLabel("How do you do it?"),
textArea(),
buttons() |
Setting CrossSizeFull makes the text area be the full width of the Blox. Text area height still varies with window height. But it would be nice to have spacing left and right. |
||
 |
 |
new JLabel("How do you do it?"),
Blox.crossSizeFull(true),
textArea(),
Blox.crossSizeFull(false),
buttons |
| The right way to add spacing is to install a border. | ||
 |
 |
JComponent text = textArea();
text.setBorder(BorderFactory.
   createEmptyBorder(0,10,0,10));
return Blox.createVerticalBlox(
   new JLabel("How do you do it?"),
   Blox.crossSizeFull(true),
   text,
   Blox.crossSizeFull(false),
   buttons()
); |
There is also a solution with struts. This first attempt wraps the text area in a horizontal Blox and appends struts left and right. Now the width adjusts as the window, but the height does not. (I added cyan to diagnose the size. The height fails because the text area has a baseline and resides in a horizontal Blox; a horizontal Blox defaults to always assign preferred height for components with baselines.) |
||
 |
 |
new JLabel("How do you do it?"),
Blox.crossSizeFull(true),
Blox.createHorizontalBlox(
    Blox.color(Color.CYAN),
    strut10(),
    textArea(),
    strut10()
),
Blox.crossSizeFull(false),
buttons()
|
So in the inner Blox we set flags to ignore the baseline and allow expansion in the cross-wise (vertical) direction.
This is how struts can replace Borders, if necessary. |
||
 |
 |
new JLabel("How do you do it?"),
Blox.crossSizeFull(true),
Blox.createHorizontalBlox(
    Blox.baseAlign(false),
    Blox.crossSizeFull(true),
    strut10(),
    textArea(),
    strut10()
    ),
Blox.crossSizeFull(false),
buttons() |
Blox Sections Help Divide Space
The space allocated to a Blox must be divvied up among its components.
On the cross-wise axis the alignment process controls all allocations. Along
the principal axis, the relative amounts for each component can be managed
by dividing those components among different sections. Blox offers four types
of sections, although few Bloxes will use more than two types.
To divide the components into sections, a Blox.Note appears before
the first component of the section. Here are the section notes and a description of
the corresponding section.
| section start note | description |
|---|---|
BloxSection.main() |
Space not allocated to other sections is allocated to the main sections. Typically this will be the biggest section. |
BloxSection.thin() |
The space allotted to a thin section is that needed to contain all members at their preferred sizes. |
BloxSection.absolute(len) |
The len parameter dictates how many pixels are
allotted to the absolute section. |
BloxSection.percent(pct) |
The pct parameter specifies what percentage of
the full Blox should be allocated to this percent section. |
If no section note precedes the first component, an implicit main section is started.
There many be any number of sections of each type. Space is shared among those of a given type in proportion to how much that type needs in order to fulfill its definition. There may not be sufficient space to meet all requirements. In that case, sections first shrink to the size needed to meet the preferred sizes of their components. Failing that, sections shrink further to the minimum sizes of components. Fail all else, components and whole sections will disappear from the bottom or right edge.
Experience: I once had a vertical Blox holding horizontal row Bloxes each displaying a label and an object. To line up the left edge of the objects and the right edge of the labels, I divided each row into an absolute section and a main section. A glue Blox before the label arranged to have it right justified in its section. Glue to the right of the object was supposed to make the object right aligned in its section. But the rows showed up centered. They were not the full width of the space. The solution was to add a crossSizeFull note the the vertical Blox like this:
Blox show = Blox.createVerticalBlox(Blox.crossSizeFull(true)); |
For a slightly artificial example, suppose we want to display an image in the upper left of an application with the other three quarters of the window split among three tasks. In our example the tasks are, display an orange rectangle, display a blue rectangle, and show buttons to switch to another image. The wrinkle is that the four quarters should meet at a point, no matter the size of the image.
GridLayout is a non-starter for the task because it makes all cells the same size. GridBagLayout can do the job, as I'll show below. To use Blox,. we need a vertical Blox of two Horizontal Bloxes (or vice versa) and we need some way to coordinate the split location of the bottom half so it matches the split of the fop half. The trick is to split each horizontal blox into a thin section an absolute section. When the image changes size, the sizes of the absolute sections are adjusted to match the width of theabove or below thin section. It looks like this, with images of the two different window configurations.
|
After clicking "N. Racemosa" After clicking "N. Punctata" |
Blox.createVerticalBlox(
  Blox.glue(),
  Blox.createHorizontalBlox(
    Blox.crossSizeFull(true),
    BloxSection.thin(),
    bloxImage = new JLabel(),
    bloxOrange
      = BloxSection.absolute(100),
    coloredPane(Color.ORANGE)
  ),
  Blox.createHorizontalBlox(
    Blox.crossSizeFull(true),
    bloxBlue
      = BloxSection.absolute(100),
    coloredPane(Color.BLUE),
    BloxSection.thin(),
    Blox.strut(12),
    bloxFirstButton = bloxButtonCreate(
       "N. racemosa", …),
    Blox.strut(12),
    bloxButtonCreate("N. punctata", …),
    Blox.strut(12)
  ),
  Blox.glue()
); |
blox in
Nausithoe.java
The button code adjusts the sizes of the colored rectangles:
// make blue as wide as image int w = bloxImage.getPreferredSize().width; bloxBlue.setExtent(w); // make orange as wide as buttons w = (int)buttonsSection.getExtent(); bloxOrange.setExtent(w); |
Notes
- The crossSizeFull operations are in horizontal
Bloxes and affect vertical sizes. They make the colored rectangles take on the full vertical size. - The glue() elements cause the entire Blox to be centered vertically.
- The strut() elements equally space the buttons and the margins. This particular appearance is not easily done with GridBagLayout.
For applications like Nausithoe with a grid-like appearance, GridBagLayout is an alternative to Blox. It is not as difficult to use as the number of options suggests; most of them have reasonable defaults.. The key to taming GridBagLayout is to create a method that generates the needed parameters. For the application above it could be:
GridBagConstraints setGBC(
        GridBagConstraints gbc,
        int row, int col,
        int rowspan, int colspan) {
    gbc.gridy = row;
    gbc.gridx = col;
    gbc.gridheight = rowspan;
    gbc.gridwidth = colspan;
    return gbc;
} |
Creation of the screen image reuses the grid bag constraints value, tailoring it for each component to be added. The with-constraints version of the add method is employed:
JPanel val = new JPanel(new GridBagLayout());
GridBagConstraints gbc
    = new GridBagConstraints();
val.add(gbImage = new JLabel(),
    setGBC(gbc,0,0,1,1));
gbFirstButton
    = gbButtonCreate("N. Racemosa", …);
gbc.ipadx = 25;
val.add(gbFirstButton,
    setGBC(gbc,1,1,1,1));
JellyButton secondJB
    = gbButtonCreate("N. punctata", …);
val.add(secondJB,
    setGBC(gbc,1,2,1,1));
gbc.ipadx = 0;
gbc.fill = GridBagConstraints.BOTH;
val.add(coloredPane(Color.ORANGE),
    setGBC(gbc,0,1,1,2));
val.add(gbBlueBox = coloredPane(Color.BLUE),
setGBC(gbc,1,0,1,1)); |
gridbag in
Nausithoe.java
The results are an application that behaves just the same as the Blox version. Your choice will depend on your preferences.
Other Useful Methods
More Notes
Here is a summary of the built-in Blox.Note objects.
| creation method | default | where described | comment |
|---|---|---|---|
Blox |
--- | Spacing | Provide fixed spacing between its adjacent sibling components |
Blox |
<0:0:MAX> | Spacing | Create a variable width space that will be as large as needed to leave siblings at their preferred sizes |
Blox |
false |
CrossSizeFull | If true, subsequent siblings are the full width/height of the Blox in the cross-wise direction |
Blox |
true |
BaseAlign | Subsequent siblings have their baselines aligned with each other and with the baseline of the Blox |
BloxSection |
* | Sections | Start a section that absorbs all unallocated space. * The default is a single Main section |
BloxSection |
--- | Sections | Start a section displayed with at most its preferred size |
BloxSection |
--- | Sections | Start a section occupying at most the given fixed percent of available space |
|
--- | Sections | Start a section occupying at most the specified number of pixels |
Blox |
trans-parent | here | Set the background color of the parent Container (which does not need to be a Blox) |
Blox |
null |
here | Set the Component name of the parent Container(which does not need to be a Blox) |
Blox |
false |
here | If set true. when BloxLayout lays out the Blox it prints a description of the parameters it followed |
Component Orientation
One aspect of internationalization provided by Box and now Blox is
to choose the axis of the layout depending on the ComponentOrientation.
Instead of axes X_AXIS and Y_AXIS, BloxLayout can
be constructed with axes
LINE_AXIS and PAGE_AXIS. The first dictates whether
the horizontal axis is left-to-right or is instead right-to-left as in various
Asian languages. The second interchanges vertical and horizontal.
Blox interprets these logical axes just as does Box.
Testing revealed that there is no way to construct ComponentOrientation values
that affect PAGE_AXIS;
it will always be vertical. So Blox implements a factory to create
all possible ComponentOrientation values:
ComponentOrientation
.componentOrientationFactory(boolean ltr, boolean hor) |
By using all four values, Blox can produce this result from
one set of methods:
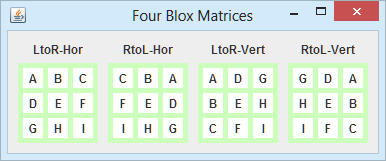 |
(OrientedMatrices is a subclass of Blox)
Blox matrixDemo(boolean ltr, boolean hor) { ...
    Blox mat = matrix();
    mat.applyComponentOrientation(
            Blox.componentOrientationFactory(ltr, hor));
... }
OrientedMatrices() {
    super(BloxLayout.X_AXIS);
    addMany(Blox.glue(),
        matrixDemo(true, true), Blox.strut(10),
        matrixDemo(false, true), Blox.strut(10),
        matrixDemo(true, false), Blox.strut(10),
        matrixDemo(false, false), Blox.glue()
    );
} |
The Blox API
The following tables list the commonly used Blox constructors
and methods. Unless otherwise noted, these methods are in
Blox.java. The following tables each cover roughly one of the topics in the document above.
- Creating
Bloxobjects - Spacing Adjustment
- Alignment on the Cross-Wise Axis
- Allocation Sections
- Other useful methods
| Method | Purpose |
|---|---|
static Blox createHorizontalBlox(Component...) |
Creates a Blox that lays out its components from
left to right. Populates it with the listed Components. |
static Blox createVerticalBlox(Component...) |
Creates a Blox that lays out its components from
top to bottom. Populates it with the listed Components. |
Blox addMany(Component...) |
Appends the sequence of components to the Blox after all previously added components. |
void openWindow(String title) |
Opens a window with the given title and displays the Blox therein. |
| Method | Purpose |
|---|---|
static Component glue() |
Create a glue component. When extra space is granted to the Blox, it is spread among the glue components. |
static Component strut(int n) |
Create a "strut" component with an extent of the given number of pixels. |
static double pixelsToPoints(int pixels) |
Convert a pixel count to a number of points. |
static int pointsToPixels(double points) |
Convert a points value to the corresponding number of pixels. |
| Method | Purpose |
|---|---|
static Component baseAlign(boolean tForAlign) |
Subsequently added components will be (if true) aligned on their baselines or (if false) unaligned. |
static Component crossSizeFull(boolean tForFull) |
Causes subsequently added components to be (if true) the width of the Blox or (if false) their own preferred width. |
void setAlignmentX(float a) (in BloxLayout.java) |
Set the X (horizontal) alignment of the Blox with respect to its own parent. (Has no effect on contents of the Blox.) |
void setAlignmentY(float a) (in BloxLayout.java) |
Set the Y (vertical) alignment of the Blox with respect to its own parent. (Has no effect on contents of the Blox.) |
| Method | Purpose |
|---|---|
static BloxSection absolute(int len) |
Subsequent components will be fit into the given length if possible. |
static BloxSection main() |
Subsequent components will occupy all remaining space. |
static BloxSection percent(int pct) |
Subsequent components will be fit into the given percent of the available space, if possible. |
static BloxSection thin() |
Subsequent components will be fit into a space equal to their preferred sizes, if possible. |
| Method | Purpose |
|---|---|
static Component color(Color col) |
Sets the background color of the enclosing Blox |
static Component name(java.lang.String nm) |
Sets the component name of the enclosing Blox |
static Component debug(boolean tForDebug) |
Instructs BloxLayout to print a data table every time the Blox is laid out |
static ComponentOrientation componentOrientationFactory(boolean ltr, boolean hor) |
Generates any of the four ComponentOrientation values |
Examples that Use Blox Layouts
The following table lists the source code for the examples above..
| Example | Topic | Notes |
|---|---|---|
| BloxHorizontalDemo.java | Align in Horizontal | Horizontal Bloxes with four components. Illustrates alignment in vertical direction. |
| BloxVerticalDemo.java | Align in Vertical | Vertical Bloxes with half a dozen components. Illustrates alignment in horizontal direction. |
| FirstBloxExample.java | First Example | Question, answer area and two buttons. |
| FirstBloxLongForm.java | First Example | FirstBloxExample coded in a Box-like style. |
| OrientedMatrices.java | Orientation | Draws SimpleMatrix four times; one with each ComponentOrientation value. |
| SimpleMatrix.java | Sample Matrix | A 3x3 matrix of letters |


